A new client just said yes to your coaching package, and you’re over the moon.
Now, how can you make sure your client has a positive experience throughout their entire coaching journey with you?
One of the most important steps in coaching your clients is the onboarding process. This sets the tone for the entire relationship — and can make or break your coaching business.
That’s why every coach should have a client onboarding checklist to streamline this process. But what needs to be included on this checklist? Where do you even start?
No worries! Keep reading this post to get a client onboarding checklist template you can customize for your own business, plus much more, including:
- What is client onboarding?
- Why should coaches use a client onboarding checklist?
- What to include in your client onboarding checklist
- Free client onboarding checklist template
What Is Client Onboarding?
Client onboarding is the process every coach should go through when welcoming new coaching clients into their world.
For example, how do you collect their information? What happens right after they’ve signed your coaching contract? Who handles the booking of sessions?
A client onboarding checklist, on the other hand, is a documented version of that process. It outlines each step that should happen in the right order.
Why Should Coaches Use a Client Onboarding Checklist?
Every coach has an onboarding process, whether they know it or not. But if you don’t know your process, you could accidentally be giving your clients a negative experience!
Here’s why a client onboarding checklist matters, no matter your level of experience as a coach.
1. Become more productive
When you have a checklist to rely on, you won’t waste any more time wondering what’s next on your onboarding to-do list.
It also allows you to get prepared for coaching sessions much more quickly since you’ll have all the vital information at your fingertips!
2. Establish boundaries
Your client onboarding checklist will act as a boundary between you and your clients. This helps you start the relationship on the right foot.
You get to show up as a leader and set expectations early on.
For example, you can establish that you require clients to complete their intake form before they jump on their first coaching session. This helps you make the most of your time with them.
Without a checklist, you can forget to remind clients of these important boundaries. And if they cross these boundaries later, it won’t be their fault for not knowing.
Your checklist takes on the responsibility of remembering each step, so you don’t have to spend any mental energy doing so.
3. Improve client outcomes
Without a checklist, you’re much more likely to let important steps fall through the cracks. In return, this can hurt your credibility or even hinder your ability to coach your client properly.
For example, imagine jumping on an initial coaching session when you’ve forgotten to send the intake questionnaire! You’d have to take this first session to ask the questions instead, which is a waste of both your and your client’s time.
On the other hand, a client onboarding checklist helps you get everything you need to show up as the best version of yourself throughout the entire coaching process. The better equipped you are as a coach, the more you can support your clients and help them achieve the outcomes they desire!
4. Get better testimonials and referrals
Your client onboarding process checklist will help you wow your new clients early on. You’ll establish yourself as a professional who knows what they’re doing.
Your clients will be much happier to give you a glowing testimonial or send referrals your way if they have a positive onboarding experience with you.
On the other hand, imagine how they’ll feel if you approach the process in a messy, scatterbrained way. They may begin to doubt your skills, which can hurt the coaching relationship.
And without a healthy client relationship, you’ll struggle to help them achieve their goals.
What to Include in Your Client Onboarding Checklist
Don’t know where to start with your onboarding checklist? Here are seven steps to consider for your own client onboarding workflow!
1. Contract and payment process
The first step in any client onboarding process should be the proposal, contract, and payment. It’s best to complete all of these in a single step when possible!
If you close your clients directly on a discovery call, you won’t need to send them a proposal. But if you don’t, you’ll need to share at least some information and benefits about your coaching program.
With Paperbell, you can complete this entire step of your checklist in one fell swoop.
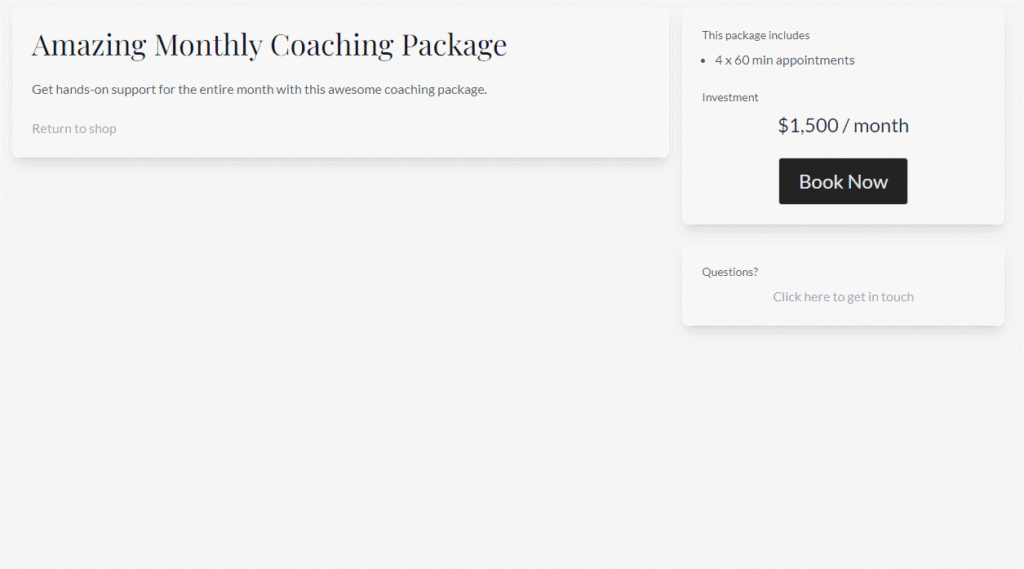
For example, let’s say you discussed your Amazing Monthly Coaching Package on a discovery call with a potential client. Once the call is complete, you can send them an email with a link to that package’s landing page.
The landing page can contain all of the necessary information your prospect needs to know to make a decision — exactly like a proposal! But instead of recreating the proposal from scratch every time, you can reuse the same landing page.
Once the prospect clicks Book Now, they’ll land on the checkout page, where they can pay you upfront!

And if you have a coaching contract, you can show the contract immediately after they’ve paid. Clients won’t be able to book their first session until they’ve signed the contract.
2. Share the coaching intake survey
No matter your coaching niche, it always helps to know as much as possible about your clients before you begin coaching them.
That’s where a client intake form comes in handy.
Keep in mind that you should have two separate forms for your free discovery sessions and your paid coaching programs. Some coaches prefer to have no intake forms at all for free sessions!
Intake forms for discovery sessions should be used to qualify potential clients and help you ask the right questions on the call. On the other hand, your intake survey will give you everything you need to tailor the entire coaching process for each client.
By sending your clients an onboarding questionnaire, you’ll save valuable time on the first coaching session. You can prepare yourself using the info your clients provide on that form, which can help you make the session much more transformative.
Without a coaching intake survey, you’ll likely need to dedicate the entire first session to asking those questions.
Guess what — you don’t need a separate survey builder if you’re already using Paperbell for Step 1. Instead, you can build and connect your forms to the relevant coaching packages.
You can also decide exactly when your client should receive your survey. For an onboarding survey, you can choose the Purchase Trigger and set it to send Immediately:

However, you can send one or several days later if you wish.
3. Send digital resources
If your coaching package includes digital products, this should be next on your client onboarding checklist:
Remember to share these digital resources in your initial welcome email. You don’t have to include the files directly in your email, but you should provide instructions for how they can access the files.
For instance, you can share a download link directly in your email. Or you can let them know they’ll receive a separate email that grants them access.
If clients unlock your digital products only later in the coaching process, let them know what to expect. This can avoid frustration and confusion for both of you!
4. Provide access to the client portal
Don’t forget to share the login information with your client if you offer a client portal like the one available in Paperbell! You can include this in your welcome email along with the intake survey and digital resources.
Even better — host your digital resources in your client portal if possible. This will give your client a one-stop shop to find everything they need relating to your coaching services.
To make it even easier for your coaching clients to make use of your client portal, you can record yourself giving a walkthrough of every feature. Don’t say anyone’s name on the portal — you can reuse the same video recording for every client!
Use a tool like Loom to record yourself quickly. Alternatively, you can record yourself in a solo Zoom meeting and use the replay.
In this step, you should also provide your client with access to the logistics they need to get your support.
For example, will you host coaching sessions on Zoom? If so, make sure they have easy access to your Zoom link.
Will you also provide Voxer coaching in between sessions? Remember to add them on Voxer and let them know which days and times you’ll be available to respond.
5. Book the first coaching session
Once your client has completed their onboarding intake form, it’s time for them to book their first session with you.
It’s up to every coach to decide how their clients can book their sessions. But if you want to save yourself some time while also providing the best possible experience for your client, consider letting clients book themselves into your calendar.
Yes — letting clients book themselves can lead to a bunch of scheduling issues when it’s not handled properly. But you can proactively solve these issues by setting up your calendar with the schedule of your choice!
Don’t want to give coaching sessions on Fridays? Block it off.
Want to save Mondays for free discovery calls? Remove your availability for coaching sessions on those days.
Not every calendar booking tool lets you set up different availabilities for each appointment type. But Paperbell does 🙂
You can even let your clients book themselves straight into your calendar right after they’ve paid and signed your contract — without leaving their browser!
6. Share your coaching process to set expectations
During your first coaching session with your new client, you should dedicate a few minutes to going over your coaching process.
For instance, will you expect them to do homework in between sessions? If so, where can they submit their homework?
Your goal should be for your client to have realistic expectations of what it will be like to work with you over the period they’ve chosen.
Ask your client if they have any questions before you move on to the next part of the session. Collect all questions in your files and periodically check where you can improve your onboarding process to answer said questions proactively.
7. Ask for a testimonial and/or referral
Once you’ve completed a few sessions with your new client, you can send them an email asking for a testimonial.
The best time to do this will depend on your coaching program. Choose a time during which you expect clients to make breakthroughs or achieve their first transformations.
In addition to a testimonial, you can also ask for a referral. Just imagine — if every client sent you a referral, you’d have to spend much less time marketing your coaching business!
New Client Onboarding Checklist Template
Want a TL;DR version of your coaching client onboarding checklist?
Here’s a template you can use for every new client:
- Contract and payment process
- Send proposal or coaching package landing page
- Send payment link
- Send contract
- Sign the contract once the client has signed
- Share intake survey
- Provide access to digital resources (if applicable)
- Share login information and credentials for the client portal (if applicable)
- Share tech logistics
- Slack
- Voxer
- Zoom link
- Other (if applicable)
- Share tech logistics
- Book the first coaching session
- Share your coaching process on the call
- Ask for a testimonial
- Ask for a referral
How Often Should You Update Your Client Onboarding Checklist?
In the beginning, you’ll have to create your first client onboarding checklist and set up all your automations. You can rely on this checklist for a long time.
However, there will come a time when you’ll need to update your client onboarding checklist.
There’s no specific timeframe coaches should rely on. If your onboarding checklist still works and helps you support your clients, don’t change it!
On the other hand, consider updating your checklist if you notice gaps in your process — or if your coaching program has changed significantly over time.
What are the Most Common Client Onboarding Mistakes?
Your client onboarding checklist will help you mitigate some common mistakes, including:
- Tech nightmare: Your client arrives late to their first coaching call with you because they can’t find the Zoom link — this is one of many tech issues that plague coaches and their clients. Make sure to share all important tech credentials and information during your onboarding process.
- Lack of communication: Your client signs your contract, pays your coaching fees, and then hears nothing but crickets. Make sure your clients feel well taken care of by communicating with them as soon as possible after they’ve booked a package with you.
- Not setting expectations: What’s next in the coaching process? When can clients communicate with you? Part of the role of onboarding a new client is to provide clear expectations. Not doing so can lead to confusion and disappointment.
Nail the Client Onboarding Process
Do you feel more confident about onboarding your new clients? Once you nail this process, you’ll be able to warmly welcome every client and grow your business through referrals and social proof!
There’s no easier way to set up a smooth client onboarding process than by using Paperbell. With Paperbell, you can automate every step of the process so nothing ever falls through the cracks! Try it for free today to see for yourself.


