You’ve built a real coaching practice. You’re getting results for clients. And now you’re wondering: could I package some of what I know into something that sells while I sleep?
Digital planners are one of the most beginner-friendly passive income products a coach can create. They don’t require a full online course, a huge email list, or a design degree. Just a clear sense of what your clients need and a few hours in Canva.
In this guide, you’ll learn exactly how to create a digital planner to sell: picking your niche, designing it, pricing it right, and getting your first sales.
Here’s what we’ll cover:
- What a digital planner is (and why coaches are well-positioned to sell them)
- How to choose the right niche for your planner
- How to make your own planner to sell, step by step
- How to price your digital planner
- How to sell and promote your finished product
- How to incorporate a planner into your coaching practice
What is a Digital Planner?
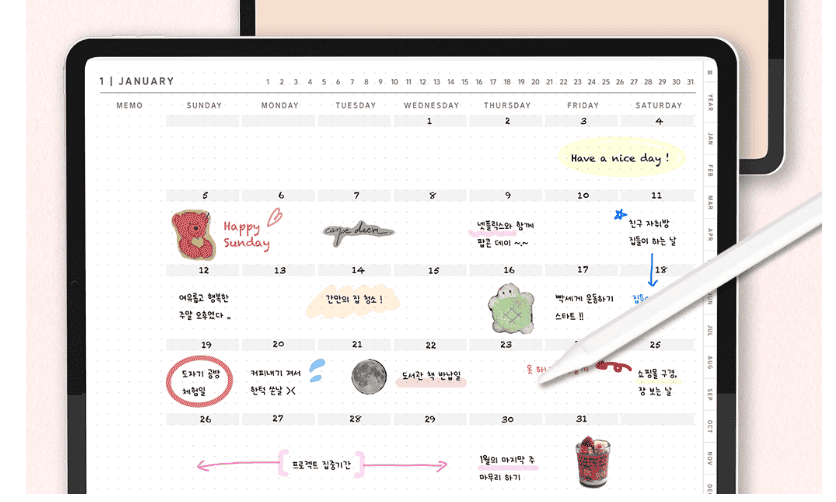
A digital planner is an electronic version of a traditional paper planner designed to help users organize their lives and achieve their goals.
For coaches, that’s a pretty natural product to build. You already know what your clients struggle with, what questions help them move forward, and what structure they need to stay on track between sessions.
Digital planners work on tablets (especially iPads with GoodNotes or Notability), laptops, and phones. The most common format is a hyperlinked PDF, where clickable tabs let users jump between sections. Far more useful than a static document.
Creating digital planners can add real value to your coaching practice by giving clients something useful and generating additional income. Use one as a bonus inside a coaching package, a freebie for your lead generation, or a standalone product you sell to people who aren’t ready for one-on-one coaching yet.
Benefits of Using Digital Planners
Most coaching tools are going digital, and planners are no exception. Here’s why clients prefer them:
- Eco-friendly: No printing, no waste.
- Accessible anywhere: Clients can open them on any device and share notes with you between sessions.
- Easy to customize: Tools like Canva and Adobe InDesign let you create branded layouts tailored to each client’s needs.
- Integrates with other tools: Many digital planning apps sync with Google Calendar, Notion, or Trello so everything stays in one place.
Examples of Digital Planners for Life Coaches
Need some inspiration before you start designing? Here are a few worth browsing:
- The best planners by the GoodNotes blog: A range of styles and formats to spark ideas of your own.
- Cheqmark: A free monthly planner template that’s clean and easy to use.
- Passion Planner Digital Edition: A versatile system with yearly overviews, monthly spreads, and weekly layouts.
- Amanda Rach Lee Doodle Planner: A creative planner that blends productivity with mindfulness and doodling exercises.
- Year Compass: A free yearly reflection booklet beloved by journalers. Great for understanding what dedicated users expect.
Now that you have a feel for what digital planners look like, let’s get into building one.
Choosing Your Niche (and Your Audience)
Before you open Canva and start dragging elements around, spend 20 minutes on this step. It’ll save you hours of redesign later.
The most successful digital planners aren’t generic. They’re built for a specific person with a specific set of goals. “A planner for busy people” competes with everything on Etsy. “A planner for ADHD entrepreneurs managing their first hire” has almost no competition and an obvious buyer.
As a coach, you already know your niche. The question is: what does your specific client struggle to track, plan, or stay consistent with?
Here are some coaching niche archetypes and the planner types that sell well in each:
- Life coach planner: Goal-setting sections, weekly reflection prompts, monthly review pages, vision board space, and affirmations. Focus on helping clients bridge where they are with where they want to be.
- Health and wellness coach planner: Daily habit trackers, meal planning pages, sleep and energy logs, mindset check-ins, and a gratitude journal. Clients who book wellness coaches are usually trying to build consistency, so design the planner to make showing up easier.
- Business and entrepreneur coach planner: Revenue tracking, quarterly strategy pages, a networking log, client pipeline tracker, and project planning grids. These buyers are often willing to pay more because the planner directly ties to their income.
- ADHD coach planner: Time-blocking grids, distraction logs, daily focus “one thing” sections, wins trackers, and short reflection prompts. ADHD planners need to be simple: one page, one task, one day at a time.
- Mindset and manifestation coach planner: Scripting pages, affirmation banks, a vision board section, identity journaling prompts, and weekly intention-setting. These planners often have a more visual, journal-like design.
- Student or academic coach planner: Assignment trackers, exam prep schedules, study habit logs, and weekly priority grids. This niche skews toward the back-to-school season, which is worth factoring into your launch timing.
Once you know who your planner is for, answer three questions before you design a single page:
- What does my ideal buyer struggle to track or stay consistent with?
- What would they open every single day (vs. use once and forget)?
- What do they already use that I can complement rather than replace?
Spend some time on Etsy searching for digital planners in your niche. Look at what the top sellers include and what’s missing. That gap is often the best opportunity.
How to Make Your Own Planner to Sell Step by Step

Creating a digital planner as an additional revenue stream for your coaching business is easier than you might think. For example, Shanice on Biz is a content creator and self-published author who made $1,200 selling digital planners on Etsy.
With the right tools and some creativity, you’ll have a product your clients will actually use. Here are the steps.
Step 1: Choose Your Design Tool
The first step is deciding which design tool to build in. Your choice here mostly depends on how much design experience you have and how complex you want the planner to be.
Here are a few popular options:
- Canva: Easy to use even if you’ve never designed anything. Thousands of templates, drag-and-drop elements, and a free tier that gets you most of what you need. This is our recommendation for most coaches starting out.
- Adobe InDesign: Far more features than Canva and the preferred tool for professional designers. It has a steeper learning curve, and plans start at $22.99/month.
- Affinity Publisher: A strong middle ground between functionality and ease of use. One-time fee of $69.99 for a single platform, or $164.99 for the Universal Licence covering all platforms.
- Procreate: If you want to sketch your planner pages from scratch, Procreate is a great iPad app at a $12.99 one-time cost.
- GoodNotes: A digital sketch tool with a free trial that lets you create three notebooks. Good for seeing how your planner will look in the app where most people will use it.
- Envato Elements: Unlimited downloads of design assets for $16.50/month. Useful for sourcing icons, fonts, and graphic elements to use in your planner.
You can also buy pre-made planner templates from Creative Market or Etsy, then customize them with your branding in whichever tool they were built in.
Our suggestion? Start with Canva.

Most Canva planner templates are free, and Canva Pro ($14.99/month) unlocks more premium designs if you find one you love.
How to Make a Digital Planner on Canva
If you’re using Canva, here’s the step-by-step process:
- Set up your document dimensions. For iPad/GoodNotes compatibility, use 8.5 x 11 inches (US Letter) or A4. Go to “Create a design” and enter these dimensions as a custom size.
- Search for planner templates. In Canva’s search bar, type “digital planner” or “planner template.” You’ll get hundreds of results. Filter by your preferred style: minimal, colorful, bullet journal, and so on.
- Design your page structure. Most planners include a cover page, a monthly overview, weekly spreads, and your niche-specific pages (goal trackers, habit logs, etc.). Map these out before you start designing so you know how many pages you’re building.
- Add hyperlinked tabs. This is the move that turns a static PDF into an interactive digital planner. Create tab shapes on the side of your pages, then link each one to its destination page using Canva’s “Link” feature. This is what makes it feel like a real app rather than a document.
- Stay consistent with fonts and colors. Pick two fonts (one for headings, one for body) and two to three brand colors. Consistent design across all pages makes the planner feel polished and professional.
- Export as PDF. When you’re done, go to Share > Download > PDF Standard. This creates a clean PDF that works in GoodNotes, Notability, and any browser PDF viewer. If you want print-ready quality (for customers who might print it), use PDF Print instead.
One note: Canva’s hyperlinks only work inside the app and in exported PDFs opened in apps that support PDF links (like GoodNotes). Links won’t work if someone opens the PDF in a web browser. Mention this in your product listing so buyers know what to expect.
Step 2: Plan Your Content
As with all creative work, it’s best to create an outline before you jump into designing. Think about what your specific buyer needs, not what every planner has. What will make yours the one they reach for every single day?
Here are some elements that work well for coaching clients:
- Goal-Setting Pages: Include exercises that help clients define clear and measurable goals.
- Progress Tracker: A chart or weekly check-in that visually represents milestones achieved.
- Habit Trackers: Daily or weekly tick-offs that make building new habits feel satisfying.
- Reflection Prompts: This is where your coaching questions and journaling prompts go, with plenty of space for the client to write.
- Mindfulness and Wellness Section: Journaling prompts, breathing exercises, and wellness check-ins that blend well-being with productivity.
- Challenges and Rewards: A system where clients set their own mini-challenges and define how they’ll celebrate wins.
- Affirmations: Positive quotes sprinkled throughout, or a journaling prompt section for reflection.
- Resource Library: A section where clients can note helpful books, articles, and tools related to their goals.
- Skill Development Tracker: For clients building a specific skill, a check-in page to measure progress over time.
- Gratitude Journal: Simple and effective. Easy to include, and clients genuinely use it.
- Weekly and Monthly Reviews: Structured pages for clients to assess what worked, what didn’t, and what to adjust.
Think about the needs of your audience. What would they find most helpful? What are their biggest pain points, and how can your planner address those?
You can also download our free template pack if you want to get ideas for your coaching materials before building your planner.

Step 3: Design With The User Experience in Mind
Visually appealing design matters. But it’s the functionality that will make clients actually use your planner week after week.
A few things to get right:
- Keep fonts and colors consistent throughout the planner. Pick your palette before you start and stick to it.
- Add hyperlinks or clickable tabs for navigation. Without them, a 50-page planner is basically unusable on a tablet.
- Include customizable page templates so users can adapt sections to their specific goals and preferences.
Design will help your planner sell. Functionality will get it five-star reviews.
Step 4: Test and Refine
Before launching, run the planner through its paces. Go through it yourself, ask a trusted friend or colleague, or send a free copy to a client in exchange for honest feedback.
Check for:
- Broken links or non-functional tabs
- Formatting issues that only appear when exported as a PDF
- Sections that are confusing or take too long to understand
- Pages that feel empty or padded
Getting real feedback before launch saves you from dealing with refund requests and negative reviews later.
Step 5: Export and Prepare for Sale
Once you’re happy with the design and everything links up correctly, export the planner as a PDF optimized for tablets and computers.
In Canva, go to Share > Download > PDF Standard:
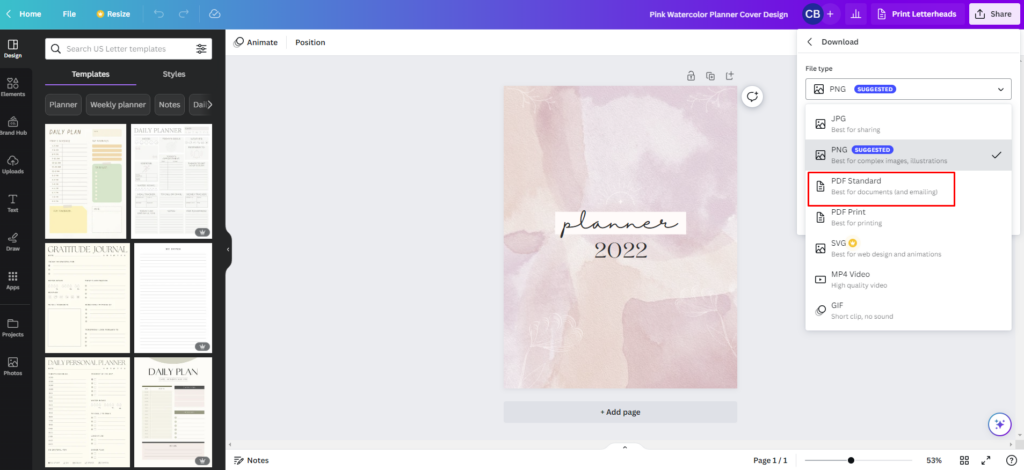
Keep your file size manageable (under 50 MB if possible). Large files create frustrating download experiences, and that’s the first thing buyers will encounter.
Create a product mockup image showing the planner on a tablet or laptop to use on your product page. It makes a huge difference in click-through rates on Etsy and other platforms.
How to Price Your Digital Planner
Pricing is where a lot of first-time planner creators undercharge. Here’s how to think about it.
First, do a quick market research pass on Etsy. Search for planners in your niche and sort by “Most relevant.” Look at what’s actually selling (check the review counts) and what those sellers are charging.
As a general benchmark:
- Basic or general digital planners: $5–$15. These are simple, minimal, and usually compete on design more than depth.
- Niche-specific planners with real content: $15–$35. Once you’ve built something with real coaching structure, solid design, and genuine content, $20–$25 is a reasonable starting point.
- Premium coaching planners (50+ pages, hyperlinked, branded): $35–$75. If your planner includes video walkthroughs, companion worksheets, or access to a resource library, you can charge on the higher end.
A few pricing factors beyond market benchmarks:
- Production costs: What did you spend on design tools, stock assets, or a freelance designer? Factor these in when setting your floor price.
- Perceived value: A planner branded around your coaching methodology (with your name, your frameworks, your prompts) commands more than a generic template from a stranger on Etsy.
- Your audience’s budget: Coaches working with corporate professionals can often charge more than coaches working with new graduates or students. Match the price to what your typical client would spend on a useful tool without thinking twice.
One strategy worth considering: launch at a lower price point (say, $12–$17) to accumulate your first 10–20 reviews, then raise the price once social proof is in place. Reviews move the needle on Etsy more than almost anything else.
If you’re selling through your coaching packages on Paperbell, you can bundle the planner into a package rather than selling it standalone. Clients see it as a perk of working with you, not a separate purchase. The pricing conversation often disappears entirely.
How to Sell Digital Planners
Time to get your planner in front of buyers. Here’s how to approach it.
1. Choose a Platform for Selling
There are plenty of platforms that let you sell digital products. A few popular ones:
- Etsy: A marketplace of handmade, vintage, and creative products. Great for discoverability, since buyers are already searching there.
- Sellfy: Lets creators sell digital products directly to their audience with a customizable website.
- Podia: An all-in-one platform combining digital downloads, online courses, and memberships.
- Payhip: A simple digital product marketplace with discount codes and affiliate marketing built in.
- Gumroad: A straightforward platform for selling digital products directly to your audience.
But here’s an option many coaches overlook: you can also use Paperbell to sell your digital planners alongside your coaching packages.
That means no extra platform fee, no separate login for clients, and no juggling multiple tools. Once you set up your coaching package, you can add any digital materials (including planners) directly inside it.
You can upload both video and PDF content via a link or a file:
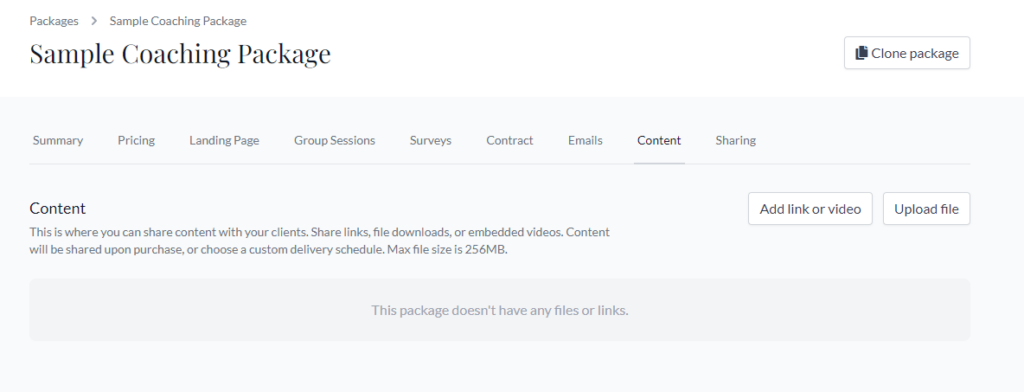
Keep your digital planner in the same place you sell your coaching packages: no transaction fees, no extra tools, no extra logins for clients.
2. Set up Payment Processing
For your digital planner to sell, clients need a simple way to pay. The two most widely trusted processors are Stripe and PayPal. If you’re using Paperbell, you can use one of them with no separate setup needed.
After you set up your package, Paperbell automatically creates a page where clients can read about what’s included, sign up, and send payment.
3. Promote Your Digital Planner
Once your planner is live, here’s how to get eyes on it:
- Email your list: If you have coaching clients or newsletter subscribers, announce the launch and share what problem the planner solves.
- Social media: Share the planner on Instagram, Pinterest, and LinkedIn. Pinterest in particular drives a lot of traffic to digital product listings.
- Collaborate: Partner with coaches or creators in related niches who can introduce your product to their audience.
- Content marketing: Write blog posts showing how to use the planner and include links back to your product listing.
- Podcast appearances: Share your expertise on relevant shows and mention the planner as a resource for listeners.
- Run ads: Google or Facebook ads can work well for digital planners, especially if you’ve got a few reviews already. Start with a small daily budget and test what converts.
4. Track Your Sales Performance
Once you start selling, keep an eye on:
- Number of sales per month
- Revenue generated
- Where buyers are coming from (Etsy search, social, email, etc.)
- Conversion rate on your listing page
Read every customer review and use that feedback to improve the planner. A second version with added pages based on buyer feedback is often easier to sell than a brand-new product.
Incorporating a Digital Planner Into Your Coaching Practice
This is where coaches have a real advantage over generic Etsy sellers.
A planner designed around your specific coaching methodology isn’t just a digital product. It’s an extension of your practice. And that’s something nobody else can copy.
Here’s how to weave it into your client work:
- Identify client needs: Focus on the recurring challenges your clients bring to sessions. If time management keeps coming up, build a planner around it. If goal clarity is the sticking point, create a planner structured around your goal-setting framework.
- Provide resources and tools: Add helpful links, worksheets, and templates to the planner that complement what you cover in sessions. Turn it into a portable version of your coaching methodology.
- Make it yours: Add your branding, your motivational quotes, your signature frameworks. A planner that reflects your coaching identity builds trust before clients even book a session.
For instance, if you help entrepreneurs manage their time, create a planner with:
- Goal-setting sections tied to revenue targets
- Weekly scheduling templates built around their unique business rhythms (client calls, content creation, networking)
- A curated productivity resources page
When clients use your planner between sessions, they stay connected to your work. Good for retention, and it tends to generate word-of-mouth: people see the planner and ask where it came from.
FAQs About Digital Planners
How Do I Create My Own Digital Planner Business?
Start by designing your templates using Canva, Adobe InDesign, or Affinity Publisher. Once you’ve built your pages, sell them on Etsy, through your own website, or by uploading them to Paperbell as part of a coaching package. The most successful digital planner businesses start with a clear niche and one strong product, then expand from there.
Can I Make Passive Income from Selling Digital Planners?
Yes. Once your planner is uploaded and listed, it can sell without you doing anything. Platforms like Paperbell handle delivery automatically, so you earn money without sending files manually. That said, passive income is rarely truly passive at the start. You’ll need to promote it to generate initial sales and reviews.
Can You Sell a Digital Planner Made on Canva?
Yes, you can sell digital planners designed in Canva. Just make sure all the design elements you use have a commercial license that allows resale. Canva’s free and Pro elements generally allow this, but check their content license if you’re using anything from external contributors.
How to Make a Planner to Sell on Etsy?
Follow the five steps in this guide to create your planner, then set up an Etsy seller account, create a compelling listing with a product mockup image, and price based on competitor research in your niche. One thing to consider: if you also sell coaching packages, adding your planners to Paperbell lets you avoid Etsy’s transaction fees and keeps everything in one place for clients.
How Much Do Digital Planners Sell For?
Most digital planners on Etsy sell between $5 and $35, with basic planners on the lower end and niche-specific, well-designed planners in the $15–$35 range. Premium coaching planners with lots of pages and interactive tabs can go for up to $50–$75. Check Etsy pricing in your specific niche before setting your price. What sells for $30 in the wellness niche may only sell for $12 in the student planner niche.
What’s the Best App to Make a Digital Planner?
Canva is the best starting point for coaches who aren’t professional designers. It’s free to start, has plenty of planner templates, and lets you export a hyperlinked PDF in minutes. If you want more control over layout and typography, Affinity Publisher is worth the one-time fee. Adobe InDesign is the professional standard but has the steepest learning curve.
Do I Need Design Experience to Create a Digital Planner?
No. Canva’s templates handle most of the design work for you. Your job is content: figuring out what pages your clients need and what prompts and trackers to include. That’s where your coaching expertise actually comes in. A thoughtful, well-structured planner will outsell a pretty but generic one every time.
Start Creating Planners to Grow Your Coaching Business
Now you know how to create a digital planner to sell: choosing your niche, building it in Canva, pricing it right, and getting it in front of buyers.
The best part? You don’t need to build a separate business to sell digital planners. If you’re already coaching, you already have the expertise. The planner is just a way to package it.
To keep your planners and coaching packages all on the same platform, try Paperbell for free and see how easy it is to add digital downloads to your existing packages.

Editor’s Note: This post was originally published in June 2023 and has been updated in 2026 to add new information, niche examples, and pricing guidance.